Friday, April 11, 2014

Laura's Carolina Baked Chicken


I'm always looking for new ways to cook chicken. Why? Well frankly, chicken is cheap, and when feeding a family of four, cheap is good!

A little while ago, I ate lunch at the Whole Foods café. This is something I rarely do because so much from their deli uses canola oil, and it's expensive, but when I'm out shopping & need a quick lunch it's a great option for me. Last time I went they had some "Carolina Grilled Chicken." It was really delicious, but I thought it needed a few changes, so I set to work.

Mine is baked-- hence the name-- because I can't grill at my apartment. Sad face. However, you could totally grill this if you wanted. Also, I used chicken breasts, but you can use this sauce and method for any cut of chicken-- think rich meaty thighs. Mmmmm...The mix of flavors for this chicken are fantastic. My children scarfed it down! I had to stop myself at one breast or I would've just kept eating.

I hope you enjoy this chicken as much as my family did!


Laura's Carolina Baked Chicken


Ingredients:


4-6 chicken breasts (or whatever cut of chicken you prefer)
1 cup olive oil
1/3 cup dijon mustard
1/4 cup sundried tomatoes (packed in oil)
2 Tbs fresh thyme + more for sprinkling
1 head garlic peeled
Salt & Pepper to taste

Directions:


Preheat oven to 375*F. Place olive oil, dijon, tomatoes, thyme, & garlic into a food processor or blender. Blend until puréed into a sauce. Add salt & pepper to desired taste. Place chicken onto a baking pan or cookie sheet. Coat both sides with sauce. Sprinkle the tops with a little more thyme. Bake for approximately 30 min, give or take, until the internal temperature reaches 160*F (always check the thickest part of the chicken breast). The sauce will brown a bit, but don't worry-- it's not burning. Remove and let the chicken rest for 10 minutes.

Serve with your favorite veggie side and ENJOY!


Thursday, April 10, 2014

Liebster Awards!


This picture says it all. Haha! But, seriously...A Liebster?? I'm so honored!!

A huge thanks to both Meg at The Recipe For Healing and Linz of @healthyhues on Instagram for nominating me! Both of these ladies are extraordinary clean eating, food making powerhouses. I highly recommend you follow them both.

It's really humbling to be nominated, especially since I just do this little blog for kicks and giggles. I don't have time to commit to it much more than I am already, so I'm thankful for the recognition. Every time someone says they've enjoyed a recipe, or have found inspiration in my story I'm grateful. That's the best way to say it! So, THANK YOU to all of you my readers & followers!

I'll answer Meg & Linz's questions below, but first....MY NOMINEES!


1. Candace at BeYOUtifully Delicious. She was one of the first gals I connected with on Instagram when I started following fellow clean eaters, and I am so glad our paths crossed! She has a phenomenal story. She is real. And to top it all off, her food is DIVINE and she lifts like a boss. Bold, and not afraid to take risks, her recipes will add all sorts of spice to your life! And, if it's inspiration you're after, look no further! She is truly beYOUtiful, inside and out! And, how can I not love a girl who loves OMghee?!

2. Laura at Mangia Paleo (Eat Paleo). Not only is she awesome because she's named Laura (sorry, but it's true), but she's fighting her Ulcerative Colitis through Paleo. Her story is so inspiring. Also, being Italian, you know that girl can cook! Her recipes are phenomenal, and her blog also includes lots of informational posts as well, which the food nerd in me LOVES!

3. Jody at Paleo'ish On A Dime. This mom of a million kids (ok, I'm exaggerating, but she has a lot of kids), knocks Paleo'ish cooking out of the park. She is fighting Mitochondrial Disease with food, and she feeds her 7 kids gluten free, dairy free, and a bunch of other allergy culprit free, meals! Talk about Super Mom! She honestly inspires me EVERY SINGLE DAY. She's real, balanced, and funny-- winning combination. 

4. Jess at Paleo Jess. This Aussie mom of 4 is one of my favorites to follow. We share a common faith (christianity), and a love for Whole9/Whole 30 eating. Not only is she rocking the fitmom life, but she uses her blog to bring exposure to a topic that is dear to my own heart-- human trafficking, modern day slavery. To top it all off, SHE RUNS A BUSINESS. Hello Wonder Woman! Her business-- Primal Life Marketplace-- provides healthy foods in bulk at affordable prices. WOW!!

All of these women inspire me everyday, and make me want to be a healthier stronger woman in every area of my life.

Now, ladies, should you choose to accept this Liebster award, your questions are the following:

1. What is your favorite Paleo meal?

2. What is your favorite NON Paleo meal?

3. Who inspires you to live healthier?

4. What is your goal in having a blog?

5. What is your favorite pastime/hobby besides cooking?


My Answers to Meg's Questions:


1. How did you eat before you decided to change your diet?
  
    I was a rollercoaster dieter! I tried everything under the sun. It usually involved severe calorie restriction which resulted in binge eating 1-2x a week. I have a past of eating disorders, so I was always fighting the temptation to slip into that bondage (that's exactly what it is) again.

2. What are your favorite foods too eat, cook, and bake? Have you always enjoyed being in the kitchen?

     My favorite Paleo foods to cook & eat are lamb, duck, and steak. Unfortunately, I gain the most pleasure from standard baking-- YIKES!! I still get to do it weekly for church events, so I get my urges out without temptation. I have always loved baking-- it's in my blood, but I grew to love cooking as I had a family and started cooking more often to save money. Now, I can spend all day in my kitchen with my favorite apron on, the windows open, and my favorite tunes!

3. What made you want to start a blog? What do you wish to accomplish with it?

    I started the blog because I constantly had people telling me I should start a blog. Peer pressure!! I realized that it would be a good way to get all my favorite recipes in one place. It just made sense. I hope to inspire people to cook real food that nourishes them body and soul! I want people to realize that they don't have to be afraid of the kitchen. Paleo can be intimidating for people who aren't used to cooking 3 meals a day, and I hope that my recipes can help them realize there's no reason to be afraid!

4. If you could do/be anything what would it be? There are no limits.

   Honestly, I would run an eat in/carry out bakery, focusing mostly pies. Yes, a standard american bakery (GASP), with a few Paleo goodies in there as well, of course. There is nothing I love more than seeing the look on someone's face when they bite into a dessert I've lovingly made. Pie making is my strongest skill that has taken a while to perfect. I'm pretty passionate about pie.

5. Who are some of the people that inspire you to eat clean?

    My children and husband. Eating clean helps me have the energy and focus to take the best care of them possible. As a homeschool mom, I can't do my job without the proper fuel. They are my whole life-- and I hope to have a healthy life with them!

My Answers to Linz's Questions:


1. What is the best consequence for you by eating a healthy diet?

    Emotional freedom from yo-yo dieting & eating disorders. Yeah, I've lost a bunch of weight. Yeah, I have loads of energy. Yeah, I sleep better. Yeah, I did away with sinus issues. But, the best was FREEDOM from the idea that I had to starve myself to be healthy.

2. What healthy food do you find yourself craving?

    Veggies. Veggies, veggies, veggies. It sounds weird, but sometimes I will just make myself a big bowl or plate of them.

3. What do you do with your time when you aren't in the kitchen?

    Well, most of my day is spent homeschooling our boys. But, I love to hike, read, and go to museums. Right now it's softball season, so that keeps me busy also. This is technically the kitchen, but I do help with our weekly church dinner as well-- usually dessert duty-- which means baking dessert for 40-50 people once a week.

4. What is one thing you love about yourself?

    I'm pretty fearless. I love a good challenge. I'll face anything, head on.

5. What has been your biggest accomplishment?

    My children. Yeah, it sounds so cliché, but it's true. I look at them and nothing I've ever done or will ever do compares to the responsibility I take on each day in raising & teaching them. I just hope I don't screw them up ;)


Tuesday, March 25, 2014

Laura's Paleo Hotcakes

Put on your prettiest apron and whip up something incredible!

I know it seems a little silly to reinvent the wheel. There are a million Paleo pancake recipes out there, and I won't pretend that these are going to be your favorite, but they are mine!

These are basic, low carb, unsweetened (as pancakes should be in my not-so-humble opinion), sturdy and thick! Use them for a savory breakfast sandwich or top with your favorite fruit, raw honey or pure maple syrup for a treat!

The hotcakes are 21 Day Sugar Detox friendly, also!

I hope you enjoy these hotcakes as much as my family does!


Laura's Paleo Hotcakes (makes 12 cakes)


Ingredients:


5 eggs
1/4 c + 1 Tbs (or 5 Tbs) coconut flour
1/4 c + 1 Tbs (or 5 Tbs) almond flour
1 tsp baking powder
1/2 tsp ground cinnamon (optional)
1 liquid cup almond milk
Ghee or coconut oil for cooking (I love OMghee)

Directions:


In large bowl, whisk eggs. Add dry ingredients mixing well. Slowly add milk, mixing well. I like to add the milk slowly so that I can add a little less or a little more depending on the consistency of the batter. It may vary depending on the brand of flours you use.

In a pan over medium-low heat (I set mine just below medium), melt some fat-- a little goes a long way. You can also use an electric skillet (I set mine at 375*F). Pour three Tbs of batter per cake into the pan. Allow to cook for 1-2 minutes until sturdy and ready to flip. Flip carefully! I like to re-grease the pan after each batch of cakes to make flipping easier.

Top with your favorite things & ENJOY!

Wednesday, March 5, 2014

Creamy Avocado Cilantro Lime Dip (dairy free)

Zesty & creamy, this is the perfect dip for the warmer months ahead!

Things are starting to feel a little bit more like Spring each day here in South Carolina, and after this year's Polar Vortex winter, I couldn't be more relieved! With warmer weather comes colder, lighter food. Don't get me wrong, I will still be smashing down some ribeye & cauli mash, but when you've been out in the heat working out or gardening, sometimes it's nice to sit on the porch with a tall glass of kombucha and a cold snack.

This dip will be PERFECT for the warmer days & nights ahead. Creamy & zesty, it pairs perfectly with fresh raw veggies. It would even be delicious over a taco salad! My naughty husband, of course, went straight for the chips after eating 2 or 3 obligatory sticks of carrot-- so, if you're feeling naughty, grab some clean gluten free non-GMO chips, or some Paleo almond flour chips & dip away!

Creamy Avocado Cilantro Lime Dip

Ingredients:


1 avocado
4 Tbs full fat coconut milk
Juice of 2 limes
3  heaping Tbs fresh coarsely chopped cilantro (1 Tbs dried)
1 tsp ground cumin
1 tsp garlic powder
Salt to taste

Directions:


In a blender, food processor, or with an immersion blender, blend all ingredients together until creamy. Start slowly with the salt-- you can always add, but you can't take away!

It's that simple!

Thursday, February 27, 2014

Creamy Chicken & Kale Soup (dairy free)

Dairy free creamy soup...Yes, please!!

I'm not much for soup, unless it's creamy soup. Cream of broccoli, cream of mushroom, creamy potato, clam chowder, shrimp bisque. Creamy soup = Laura's undying love and devotion.

Enter problems with dairy. I actually ate cheese & heavy cream in moderation for a long time after going Paleo. I started having pains in my stomach to the point that I was getting tested for gall bladder problems. When multiple tests came up normal, I decided to see if cutting dairy would help. Fortunately (and unfortunately) the problem was solved. Dangit. Milk I can take or leave, but heavy cream & cheese-- that was hard.

Thankfully, there's an easy way to get creamy soups while being dairy free. The base is simple-- purée cauliflower with broth and full fat coconut milk. You can make it as thick or thin as you want-- simply add more or less broth. I do this all the time, and it completely satisfies my craving for cream based soup, and I get more veggies in the mix. Score!!

For this soup I boiled a whole chicken to get both meat & broth. You could say that I KILLED TWO BIRDS WITH ONE STONE. Ahahaha! Punny! It's easy, and the soup is still a one pot meal. I give instructions below, but you could also just use some broth you already have & any chicken meat-- baked or roasted.

This is an easy, rich and delicious soup that I'm sure your family will love!

Creamy Chicken and Kale Soup

Ingredients:


1 whole uncooked chicken
Water (amount depends on size of chicken & pot)
2 heads cauliflower chopped
1 yellow onion chopped
8 cloves garlic
1 can full fat coconut milk
3 cups chopped kale
2 tsp ground thyme
Salt & pepper to taste

Directions:


For Broth & Meat...

Place whole chicken into a large deep pot. Add water to cover. Sprinkle in a little salt. Bring water to a boil. Cover and let boil for anywhere from 1.5 hours to 4 hours. The chicken will be cooked after about 45 minutes, but the longer it boils, the more flavorful the broth. When done, remove chicken from broth and set aside. It will fall apart as you remove it, so have a strainer handy to remove any bones or cartilage from the broth. If you want a thicker soup, set aside some of the broth. The less broth, the thicker the soup.

For the Soup...

To the broth, add cauliflower, onion, & garlic. Allow to boil until cauliflower is soft & falls apart easily. While the vegetables are cooking in the broth, use two forks to remove the chicken meat from the bone and shred.

Once the cauliflower has cooked, remove from heat. Add the can of coconut milk. Using either a submersion blender (easiest option) or a regular blender, purée the vegetables, broth & coconut milk until smooth and creamy. Add the shredded chicken, thyme, and more salt and pepper to taste. Mix in the kale. Return to heat and simmer until the kale is wilted.

Pour yourself a hearty bowl and garnish however you wish-- hello crispy bacon!! ENJOY!


Monday, February 24, 2014

Bacon Wrapped Venison Back Strap

These tender flavorful venison back straps are sure to please!

When my husband's uncle brought us some venison back strap, I was thrilled! What's so special about back strap? It. Is. So. Tender. Especially when prepared properly! Back straps are best cooked at high & fast, and served rare to medium rare. Grilling them is one of the best ways to prepare them, but unfortunately we live in an apartment and cannot grill, and I do not own an indoor grill or grill pan. The next best option is to broil, which was my chosen method.

"Properly prepared"also includes prep. So, let's get right down to the nitty gritty of venison prep.

Prepping Your Venison Back Straps


As with any cut of venison, you will want to trim off any white portions-- including fat. Venison fat doesn't taste good at all. Some deer that have lived in agricultural areas feeding on corn and soy crops can have good fat, but it's hit or or miss and you do not want to risk it! After you've trimmed the meat, soak it in salt water overnight. This draws out the blood from the meat. Place the meat in a large bowl. Fill with water to cover the meat and add 2 tablespoons of salt. After you've soaked the meat overnight, remove it from the salt water, rinse and pat it dry.

Marinading is a great way to tenderize your venison. This will make the back straps even more flavorful and tender. For these back straps I used a red wine based marinade. I always use wine when cooking venison. Not only does it add to the flavor, but the wine also acts as a tenderizer. You will want your meat to marinade for a minimum of 3 hours, but closer to 6 hours is better.

Back Strap Marinade (for 8 pieces)


Ingredients:


1 liquid cup red wine (Merlot or Cabernet Sauvignon are best)
1 liquid cup extra virgin olive oil
2 tsp ground mustard
2 tsp ground thyme
1 tsp paprika
2 tsp sea salt

Directions:


Mix all the ingredients in a bowl. Place your back straps in a large bowl or casserole dish. Pour marinade over the meat. Cover the dish well and place in the refrigerator. Allow to marinade for 3-6 hours. The longer the better.

Once your back straps have marinaded you're ready to get cooking!

Cooking Your Venison Back Strap


Ingredients:


8 pieces of marinaded venison back strap
8 pieces of high quality bacon
Parsley (dried or fresh) for sprinkling

Directions:


Turn oven broiler on high, make sure oven rack is in the middle. Wrap each piece of venison back strap in a piece of bacon. Sprinkle both sides with some parsley. Place in a pan and put into the hot oven. Broil on high for 5-7 minutes on each side until the internal temp reaches 125-135*F. Once finished, remove from the oven and allow to sit for 5-10 minutes. The meat will continue to cook up another 5*F as it sits.

Serve with your favorite Paleo sides and ENJOY!

Tuesday, February 18, 2014

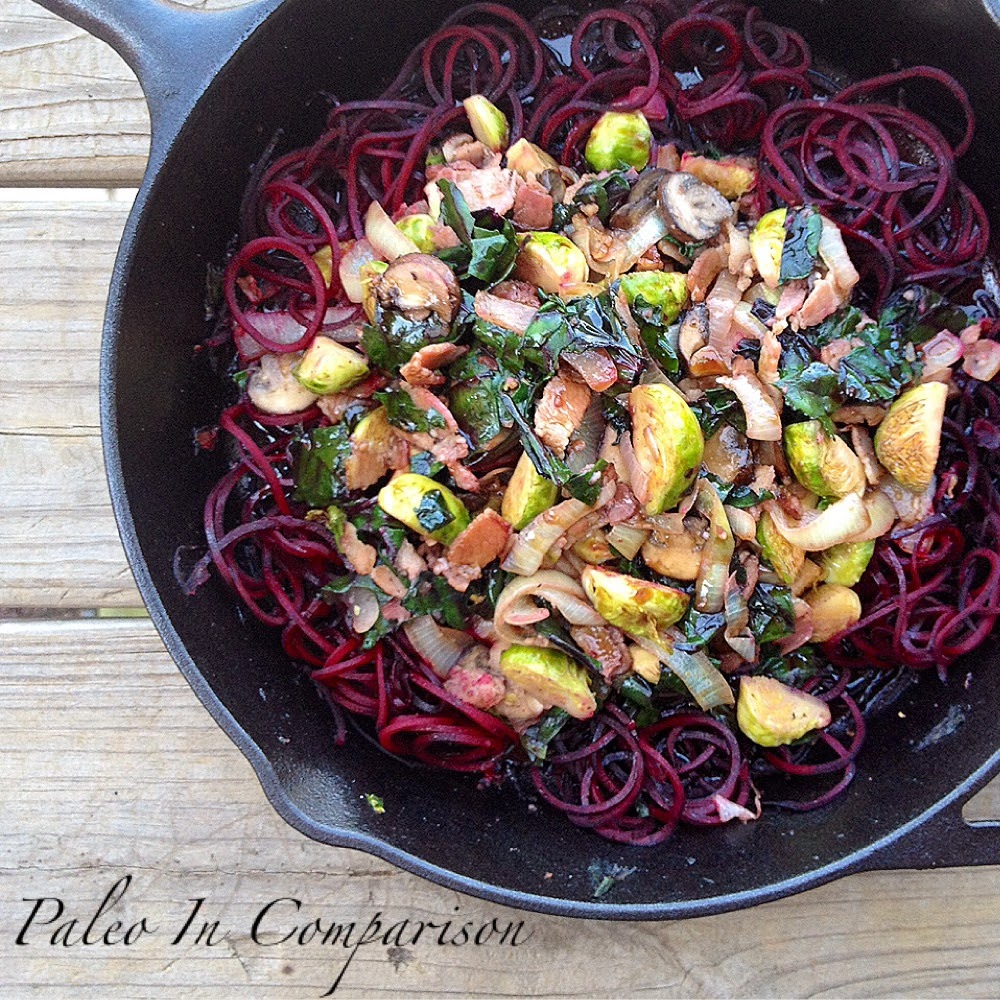
Hot Beet Noodle Salad

Looking for a way to add a variety of vegetables to your plate? Look no further!


As most of you know, I'm currently obsessed with my spiralizer. My newest obsession are beet noodles. I mean, seriously. I loved beets before, but in noodle form they are so much better. I know it's all psychological, but still-- so much fun.

Fun, delicious and so so so good for you, beets really are a super vegetable to have as part of your regular diet. In this dish I paired them with everything but the kitchen sink-- beet greens (waste not want not), brussels sprouts, onions, mushrooms, & garlic. That's why I'm calling it a salad! This dish is a fantastic way to get a variety of vegetables (and a fungus, too) on one plate-- and it's a one pan dish, not including the reduction, which is optional. You can simply serve this as a side, or you can top it with some grilled or sautéed chicken to make it a meal!

Don't have a spiralizer? Sad face, but never fear! Simply slice your beets thinly & then quarter the slices. This will help them cook up quickly in the pan.

In the directions, I have cooked up the other vegetables first & then removed them from the pan to cook the noodles. You can just throw the noodles into the pan with everything else to cooke them, but keep in mind they will turn everything pink! So if you are going for something aesthetically pleasing, I recommend cooking the beet noodles on their own.  If you wish to just throw it all in the pan, go ahead and add the beet noodles at the same time you add the greens & garlic for an al dente noodle. Add them earlier if you want your noodles softer.

Hope you enjoy!

Hot Beet Noodle Salad (serves 2 heartily)


Ingredients:


3 medium beets with greens
4 slices of raw bacon chopped
1.5 cups brussels sprouts quartered
1.5 cups sliced baby bella mushrooms
1 small yellow onion sliced (1/2 if large)
6 cloves garlic crushed
Salt & pepper to taste
1 liquid cup balsamic vinegar (for reduction, optional)

Directions: 


First, remove the greens from the beets. Break off the thick portion of the red stem. Rinse the greens and tear or chop into smaller pieces. Cut the ends off the beet root, and peel the beet root. At this point you can either spiralizer your beet roots as I have, or you can slice them thinly & then cut the slices into quarters. Set aside.

If making the balsamic reduction, pour balsamic vinegar into a pan over medium-low heat. Bring to a bubble and allow to cook until the liquid is reduced by half. You can let the liquid reduce while you are cooking the veggies.

In a pan over medium heat, combine chopped bacon, brussels, onion and mushrooms. Cook until almost done. When almost completely cooked, add the greens and crushed garlic. Add some salt and pepper to taste, and cook down the greens. Remove the vegetable mix from the pan.

To the same pan, if necessary, add a little more fat (I used additional bacon grease, but any Paleo friendly oil or fat will work). Toss in the beet noodles and season with a little salt and pepper. I like to use tongs to toss them while cooking. Cook to desired softness.

To Plate:


Place some noodles onto the plate. Top with the vegetable mixture. Drizzle it all with some balsamic reduction and ENJOY!


Friday, February 14, 2014

Pulled Pork & Apple Breakfast Casserole


Who says breakfast at home can't be fancy?


Meal prep.

It is necessary on some level for anyone who lives the Paleo lifestyle. I don't meal prep lunch or dinner, but I do meal prep breakfast as often as possible. Since I strive to keep my family on the straight and narrow when it comes to food, breakfast is the biggest challenge. So much of a challenge that breakfast was the last meal we transitioned into Paleo. When you're used to just giving your kids a bowl of cereal for breakfast (it was at least gluten free), adjusting to having to prepare a full meal can be so challenging!

I know challenges like this keep many people from going full Paleo-- either for themselves or their family. I try to make most of my posts family friendly-- because my family eats them!

This recipe is actually a meal prep within a meal prep. Uh, how cool is that?? This casserole calls for pulled pork. Pulled pork is something I always recommend people cook for their meal prep. It's totally hands-off to cook, and a large hunk of shoulder or butt will yield a lot of meat you can eat on all week long-- it also freezes well! I personally love my own recipe for pulled pork-- it's the only one I use. You can find it here.

I love using pulled pork throughout the week, because when the seasonings are neutral enough, you can use it to make ANYTHING. I love putting it in hashes, and scrambles. One of my favorite pulled pork meals was this BBQ Pulled Pork Pizza.

I had some leftover pulled pork this week, but not enough to serve everyone for one meal, so I thought I'd get creative with it. Making breakfast casseroles is an easy concept really-- meat, veggies, eggs, bake. It's basically a frittata in casserole form, and it is fantastic for breakfast meal prep! Make a dish, cut it in desired sizes and throw it in a ziploc baggie on the go, or warm up a piece in the toaster oven while you get ready for work. Quick, convenient, and loaded with fat, veggies, & protein! If you'd like another breakfast casserole recipe, check out this Spicy Thai Breakfast Casserole I made a while ago. It's another favorite!

This recipe is for a smaller 8x8 casserole dish, but you can simply double the recipe for a full sized casserole dish. I paired it with some of my But Smackin' Good BBQ Sauce for added kick, and of course I included a little bit of bacon. Wink, wink. A little bit sweet, spicy, and salty this casserole is sure to please your belly & your meal prep needs!

Pulled Pork & Apple Breakfast Casserole


Ingredients:


1 cup prepared pulled pork
4 slices bacon chopped
1/2 yellow onion chopped
2 small granny smith apples chopped (you can use any apple, but granny smith will yield the most flavor)
7 eggs
Dash salt & pepper
Fat to grease pan

Directions:


Preheat your oven to 375*F. In a pan over medium heat begin to cook bacon and chopped onion. Once the bacon and onion have cooked down significantly, add the apple and cook down a bit. If your pulled pork is cold, add it to the pan when you add the apples. If it is already warm, you don't need to add it to the pan at all.

In a bowl, whisk eggs well with a bit of salt and pepper. Add the cooked bacon, onions, apples & pork and mix everything well. Pour into an 8x8 greased casserole dish. Place in the oven and cook for approximately 25 minutes, until middle is cooked through.

Remove from the oven and allow to cool. Slice it up and serve it right away with a little BBQ sauce, or separate it into individual portions and refrigerate for breakfasts throughout the week!

Enjoy!

Wednesday, February 12, 2014

Laura's Pulled Pork

Not the prettiest picture, but this pulled pork is AMAZING


I'm sorry that I don't have a fantastic picture for this recipe, but this recipe was previously sharing a post with my Pulled Pork Apple Sliders and I wanted to let it have it's own post. I use this recipe every time I make pulled pork, and I use the leftovers for all kinds of dishes. I get SO MANY compliments on this when I make it. It's incredibly juicy and tender. It's flavorful, but neutral enough that the leftovers can be used for anything; and to top it all off, it's so easy-- especially when you make it in your slow-cooker or crock-pot! This is a fantastic recipe to make for meal-prep, and it's a favorite of mine for large crowds because even non-Paleoites love pulled pork!

I hope this becomes a regular recipe on your menu, as it is on our's!

Laura's Pulled Pork

Ingredients:


4-5lb pastured pork shoulder/butt (depends on what your butcher likes to call it)
2 Tbs garlic powder
2 Tbs onion powder
1 Tbs ground coriander
1/2 Tbs ground allspice
1/2 Tbs turmeric
1/2 Tbs chili powder
1 Tbs sea salt
Dash or two of pepper

Directions:


Preheat oven to 250*F (not necessary if using a slow-cooker/crock-pot). Mix all spices in a bowl (I have used only a Tbs for measuring so you only need one measuring spoon--less clean up & convenient). Place pork shoulder in a deep roasting pan. Spread dry rub over on pork, covering all sides with a thick coating. Cover with foil. Place in oven and let it cook low and slow for up to 8 hours. 5lbs usually takes a full 8. If you get two smaller cuts (i.e. 2, 2lb cuts) it will only take about 5-6 hrs. The meat should fall easily away from the bone, and the pan should be full of juices. You can also cook this in a crock-pot/slow-cooker on the low setting. Remove bone from meat. Shred meat by pulling it apart using two forks. Mix it in with the juice to allow the meat to soak up all that flavor! 

ENJOY!

Strawberry Ginger Pancakes

A not-too-sweet treat for your Sweets!

If any of you follow my Instagram account, you can tell from my recent Valentine posts that I'm not much for romance. I don't know why, but I've never been into all that mushy love stuff-- especially Valentine's Day.

Don't get me wrong! The romantic gestures made by my husband are very sweet & much appreciated, but I'd rather go see an action movie and eat a steak on Valentine's Day than go see the latest Nicolas Sparks film and pig out on chocolates.

I do like to do fun things for my kids at Valentine's because part of the joy of childhood is enjoying even the silliest of holidays, and so Strawberry Ginger pancakes it would be!

One thing I know about Valentine's Day is that it is a sabotage on those of us trying to live as low-sugar as possible. Because I didn't add anything to sweeten the pancakes, strawberry purée, or whipped coconut cream, this is a great breakfast for people like me who don't want to go overboard this Valentine's Day. But, if you're planning to go all out, just add a little honey to your whipped cream & strawberry purée to sweeten these up even more!

This is an easy, fun, healthy breakfast that will make your Special Someone feel extra loved on Valentine's Day--or any day! I hope you enjoy this breakfast as much as my sweet boys did!

Strawberry Ginger Pancakes


Ingredients:


1 12 oz bag frozen strawberries (or 2 cups fresh chopped)
3 eggs
4 Tbs coconut flour
1.5 tsp ground ginger (plus more for garnish)
1/2 tsp baking powder
1/4 tsp baking soda
Pinch of sea salt
6 liquid Tbs coconut milk*
Cream from one can of coconut milk**
Unsweetened shredded coconut for garnish

*This is measurement is give or take. You may need a little more, or a little less depending on the thickness of your batter & the thickness of your milk. I've found that with coconut flour pancakes, the cakes cook up better when it's on the thicker side.

**To get the cream from canned coconut milk, simply place an unopened can into the coldest part of your refrigerator for at least 4 hours (overnight if making these for breakfast)

Directions:


Purée your strawberries using either a blender, food processor, or an immersion blender. Set bowl of purée aside.

In a mixing bowl, whisk eggs with a 1/2 cup of the strawberry purée (save the rest for topping). Then mix in the dry ingredients. Slowly add the coconut milk until the batter reaches your desired thickness. Meanwhile, heat up a pan on just below medium heat or an electric skillet at 350*F. Once the pan or skillet is hot, melt some coconut oil.

This is a horrible picture, but you get the idea!
If you wish to make hearts, the easiest way to do it is to use a piping bag or a gallon ziploc bag with one of the tips cut off to squeeze the batter. You have more control over the batter this way.

Pipe the shape of a heart onto you hot skillet & fill it in with more batter. Allow to cook on one side until firm enough to flip. Flip pancake and cook the other side until done.

For the coconut cream:


Open your cold can of coconut milk. The cream should have separated to the top. Remove that cream and put into a bowl. A cold stainless steel bowl is best. Save the remaining coconut liquid for smoothies or fruity drinks. I use an immersion blender to make whipped coconut cream because it is so fast; however, a regular handheld mixer will work as well. Whip the coconut cream until light & fluffy.

To Plate:


Place the pancakes on a plate & drizzle with strawberry purée (you can warm it up on the stove if you wish). Sprinkle with ginger & unsweetened shredded coconut. Top with a dab of whipped coconut cream & ENJOY!

Monday, February 10, 2014

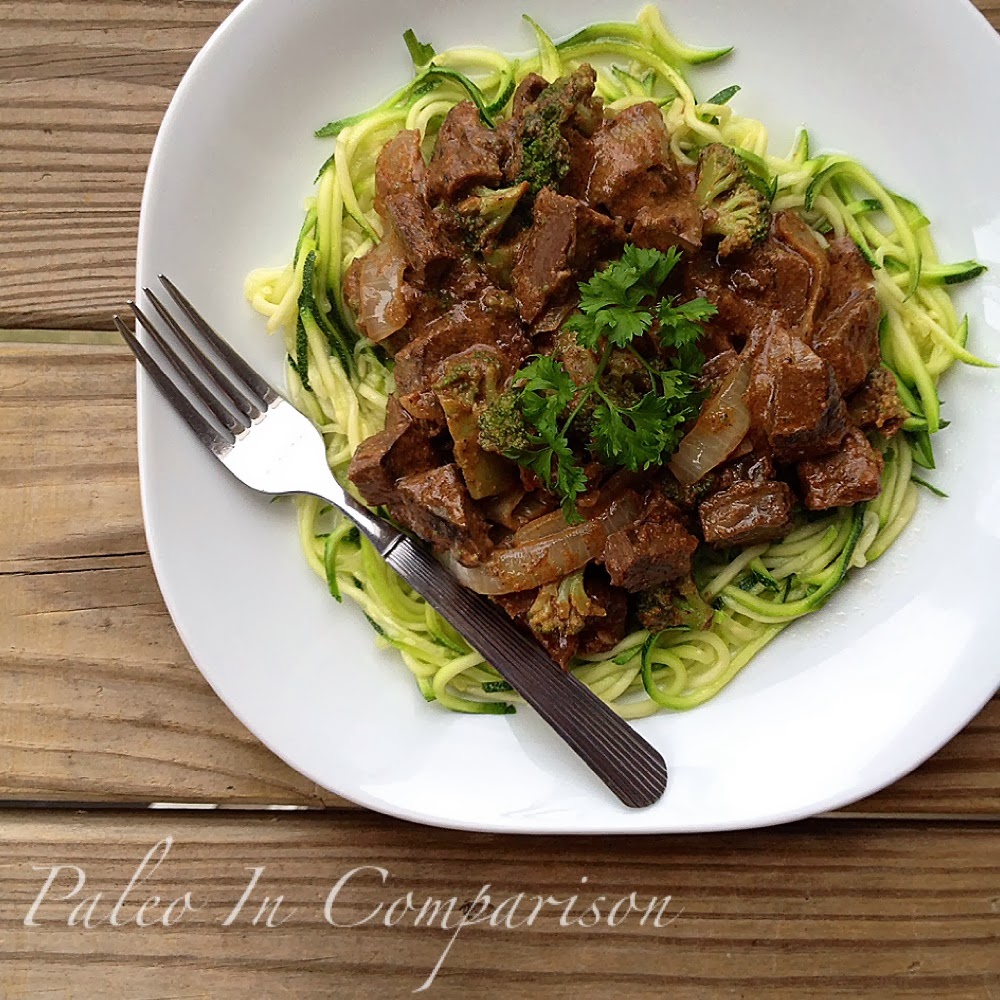
Curried Beef Heart and Broccoli with Zoodles

Make this Curried Beef Heart & Broccoli for someone you love an offal lot!

Ok, here's the deal. I don't need to tell you that organ meat is super good for you. I don't need to tell you because The Paleo Mom did a great job of it in her article, "Why Everyone Should Be Eating Organ Meat." If you don't believe me, or others, when they say EAT ORGAN MEAT, read her article for yourself and you will come over to the dark side.

Look, I'm totally with you when you say organ meat is terrifying. I'm also with you when you say it's disgusting. I will eat liver (the most nutrient dense of the organ meats), but I have to be in the mood for it-- which is rare. Steph over at Stupid Easy Paleo has a great solution for getting a daily dose of liver, even if you hate it. Check out her frozen liver pills. She takes natural "supplements" to a literal level-- awesome!

One organ I will eat on a regular basis, and one my family will eat as well, is beef heart. Whenever someone says to me that they want to start introducing organ meat, but don't know where to begin, I suggest beef heart. Since the heart is not only an organ, but a muscle as well, it has a meatier texture and flavor, but still contains many benefits of organ meat. Win-win! Also, it's inexpensive, as are all the organ meats. The heart is where to start (unintentional rhyme)! I have a simple recipe for Crock Pot Beef Heart that is a family favorite-- and super easy. It's a great way to start you and your family on organ meats!

If you're looking for another creative way to get in that beef heart, this recipe is a home run! Spicy and flavorful, the curry seasoning accents the unique flavor of the beef heart and will satisfy even the greatest of organ meat skeptics!

I used a mild Balti Curry seasoning, so since I like it spicy I added some red pepper. The red pepper is not necessary if you have a curry seasoning that is already spicy enough for your liking. Also, if you don't like spice, just use a mild curry seasoning and omit the red pepper. Simple as that!

Also, I actually used leftover beef heart from my crock pot recipe to make this. I have given the instructions on how to do this with a fresh raw heart, but if you are making this from leftovers like I did, adjust your seasonings accordingly for your portions, and add the meat at the end of cooking to warm  it up instead of adding it first.

I paired this with zoodles, but if you don't have a spiralizer this would go great with spaghetti squash or cauli rice as well.

I hope you enjoy this recipe as much as my family did!

Curried Beef Heart and Broccoli with Zoodles (serves 4)


Ingredients:


1 beef heart
2 cups chopped broccoli (fresh or frozen)
1 yellow onion sliced
1 can full fat coconut milk
3 Tbs curry seasoning
1-2 tsp red pepper (depending on level of spice you prefer)
1/2 tsp sea salt
3-4 zucchinis spiralized (depending on size of zucchinis)
3 Tbs fat for cooking (ghee is best)

Directions:


First you need to trim your beef heart. Remove any excess fat or inedible parts from the heart. Chop the heart into small pieces. Keep in mind, the smaller the pieces, the quicker they'll cook. In a pan over medium heat, melt 2 Tbs of fat. Add the chopped beef heart and begin to brown. Once the outsides have just browned, add the broccoli  and allow to cook down just a bit, then add the onions. If you are using frozen broccoli you can add the broccoli and onions together since the frozen will cook up faster than fresh. Cook in the pan until everything has cooked. Add the coconut milk to the pan and the seasonings. Stir well and allow it cook a bit longer to gel all the flavors together. While it's finishing cooking, in a separate pan over medium heat melt 1 Tbs of fat. Toss in the zoodles and sprinkle with a little salt. Cook the zoodles until just warmed through.

To Plate:


Place a pile of zoodles on a plate. Top with the beef heart and broccoli, and ENJOY!


Friday, February 7, 2014

Butt Smackin' Good Paleo BBQ Sauce

Careful. You're liable to get your butt smacked with sauce this good!

I actually shared this recipe on another post a little while back, but I wanted it to have a post all to itself-- it's that good! So if you've seen this one before, don't worry, you're not going crazy!

I'm sure you're more than a little curious about how this sauce got its name. So sit back, relax and enjoy a little cautionary tale I like to call, "What Happens When You Make Really Good Barbecue Sauce."

I wanted a really great barbecue sauce for a BBQ Pulled Pork Pizza recipe I was making, and to be honest I'm not one for following other recipes. Following a recipe bores me a bit. Yes, I'm aware of the irony in the fact that I make recipes, but don't like following them myself. Anyway...I set to work. I kept adding layers, tasting along the way until it was just right. I was meticulously measuring & noting every addition-- a little of this, a little of that, & dash or two of something else. Then I dipped my pinky in to sweeten it up a bit (ok, I may be taking some creative license here). Finally, when I thought it was perfect, I invited my husband into the kitchen for a taste test. He took a spoon and dipped it in the sauce. I waited with great anticipation. Could this be it? THE sauce? His eyes lit up as he said, "Don't. Change. A. Thing." Then he smacked my butt as he walked out of the kitchen. And with that, my Butt Smackin' Good Bar-B-Que Sauce was born.

Butt Smackin' Good BBQ Sauce


Ingredients:


6 oz can tomato paste
1.5 cups liquified bone broth or stock/broth of choice*
2 Tbs apple cider vinegar
3 Tbs raw honey
1/2 tsp ground Jamaican allspice
1 tsp paprika
1 tsp turmeric
1/4 tsp sea salt

*If using store bought stock, you may need to adjust the salt accordingly as different broths can have different amounts of salt.

**If you do not have Flavor God Everything seasoning use the following:
    1 Tbs garlic powder
    1 Tbs Onion Powder
    2 tsp paprika (in place of the 1tsp listed above)
    1/2 tsp dried basil
    1 tsp sea salt (in place of the 1/4tsp listed above)

Directions:


In a pot over medium-low heat, put tomato paste, bone broth, apple cider vinegar and honey. Whisk while heating until everything is incorporated. Add seasonings and whisk well. Allow to simmer over heat for as long as you desire. The longer it simmers, the more the flavors will come together. Stir it occasionally so the sauce won't burn to the bottom. When finished, allow to cool and pour into a jar. You can store this in the refrigerator and it will last a couple weeks-- if it lasts that long!

Wednesday, February 5, 2014

Spicy Cacao Beef Short Ribs with Peppers and Cauli Rice

Fall off the bone short ribs & peppers-- a crock-pot recipe fit for company!

I almost made regular barbecue short ribs. Thank the Lord I didn't, because these are infinitely better! Cacao? Yes. Lawd yes. The cacao brings out all the amazing flavors in these tender, fall off the bone, short ribs!

I don't know about you all, but I love a good slow-cooker/ crock-pot recipe. We're all busy, and most of us can't sit around the house all day while our oven is on, or spend an hour standing in the kitchen cooking. So, it's the glorious crock-pot to the rescue!

The crock-pot has been a kitchen staple for decades now. It is also a wedding shower staple, to which anyone who has been married in recent decades can attest. I can't even remember how many I received as a wedding gift. I thought it was crazy then, but now that I have a cooking blog, I kinda sorta wish I had kept them all. I hate to admit that there has been more than once I have wished I had two crock-pots going at once-- especially when I'm waiting on 24 hour bone broth!

I don't just make crock-pot recipes because they're popular. I make them because I actually use mine multiple times a week! As a homeschool mom whose husband works from home, I am feeding 3 Paleo (ish) meals a day, everyday, to 4 people, crock-pot just makes sense. And it makes my life 100 bazillion times easier!

So, here's a new recipe for your slow-cooker days that will wow you, your family, and even guests-- yes, this is a crock-pot recipe that is good enough for a dinner party! I hope you enjoy this as much as my family did!

Spicy Cacao Beef Short Ribs with Peppers and Cauli Rice 


For the Short Ribs & Peppers

Cacao? Yes. Lawd yes.

Ingredients:

6-8 beef short ribs
2 red peppers sliced
2 green peppers sliced
1 large yellow onion sliced
1 Tbs garlic powder
1 Tbs chili powder
1 Tbs ground cumin
1 Tbs dried cilantro (2 fresh, plus more for sprinkling)
3 Tbs raw cacao powder
1/2 tsp sea salt (plus more for sprinkling)

Directions:

In a bowl, blend garlic powder, chili powder, cumin, cilantro, 2 Tbs of cacao, & sea salt to make a seasoning mix. Place the short ribs into your slow cooker. Pour seasoning over short ribs & rub to coat all the meat. Throw all the sliced peppers and onion over top of the meat. Sprinkle with another Tbs of cacao, a little more cilantro, and sea salt. Put the lid on the slow-cooker/ crock-pot and cook on low for approximately 5-6 hours. Check the meat after 5 hours, if you can. If the meat is falling away easily from the bone, they ribs are done. If not, allow to cook for another hour and check again.

Cooked in juice from the meat, this rice extra flavorful!

For the Cauli Rice


Ingredients:

1-2 heads fresh cauliflower chopped*
4-6 cloves fresh garlic
1 ladle-full of juice from the cooked short ribs
Salt & pepper

*how much cauliflower you need will depend largely on the size of your crowd & the size of the cauliflower

Directions:

Put chopped cauliflower & garlic cloves into a food processor or blender. Pulse until the cauliflower reaches the size of rice. I like to process my cauliflower in small batches to get even sized pieces. This works well if you have a smaller food processor like myself. Once the cauliflower has been processed, in a pan over medium heat, add the juice from the ribs. Add the cauli rice with some salt & pepper and cook until just warmed through, or until your desired doneness. We like our's a little al dente.

To Plate:

Place some cauli rice on a plate. Top with a rib or two...or three if you're hungry. Wink, wink. Then add some peppers and onions, some fresh avocado, and ENJOY!

Tuesday, February 4, 2014

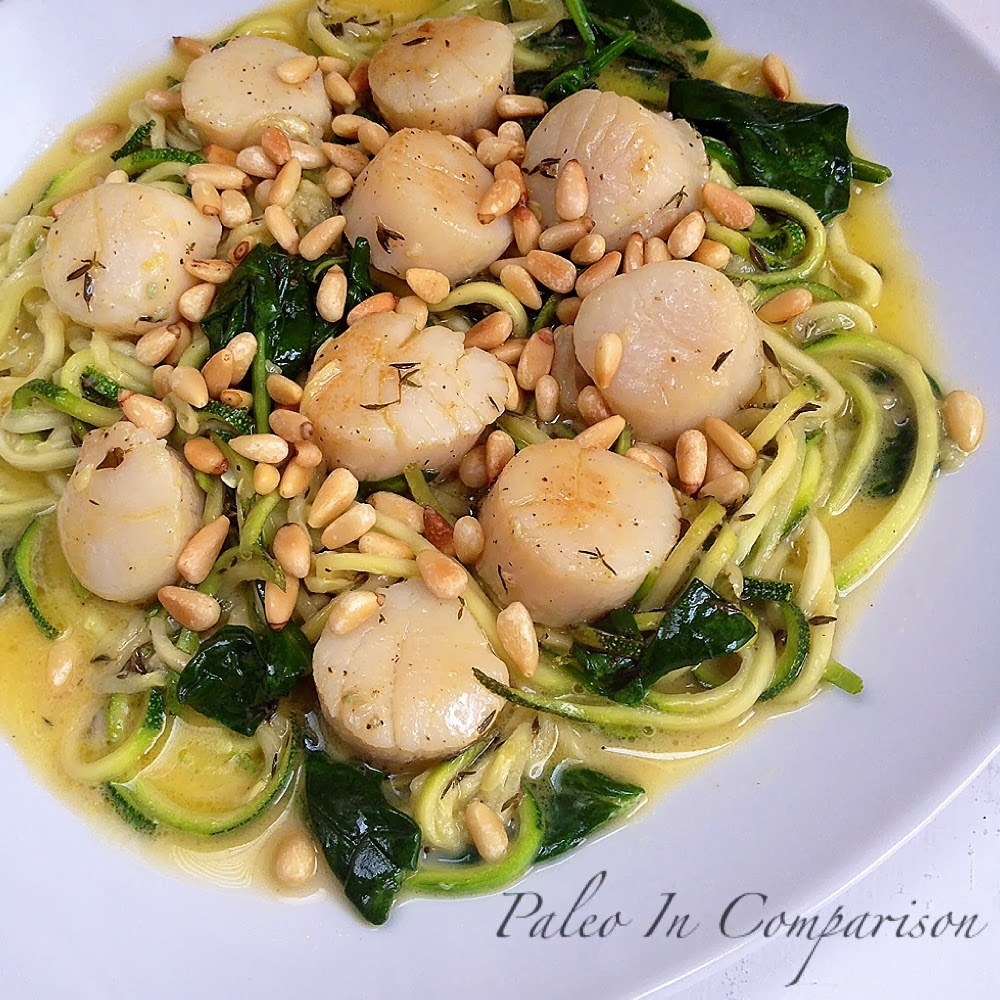
Garlic Lemon Butter (or Ghee) Scallops with Zoodles and Toasted Pine Nuts


I have been craving all things Italian lately. I think it's a subliminal message I'm getting from my new Spiralizer: NOODLE ALL THE THINGS!! I'm totally going with it, too. For the last 2 weeks I have not been able to stop thinking about lemon garlic butter. Fantasizing about it drizzled all over perfectly cooked pasta. Sometimes with chicken, sometimes shrimp. Paired with a side of buttery garlic bread...LAWD have mercy!

Like one of those cartoon characters who is running really fast and then stops himself with his heels and smoke billows up like burning rubber, my fantasies come to a screeching halt when I remember how horrible gluten and most grains make me feel. But it's all cool. I gots me a Spiralizer, so take that gluten sensitivity!! 
Oh, hey there butter.

I busted that bad boy out and made myself some garlic-y lemon-y butter-y deliciousness, and I'm sharing it with you today! If you don't have a Spiralizer, I will take a moment of silence now to mourn this sadness...

Ok, enough of that. Don't fear! This would be great over spaghetti squash as well, or you can always just cut up your zucchini & cook it that way. Spiralizing doesn't magically change the flavor. It's just super duper fun.

This definitely curbed my craving & left me super satisfied & feeling great in a way regular pasta never would. And as a bonus, it's quick, easy and everything except the pine nuts is cooked in one pan! Hooray for quick clean-up!!

Garlic Lemon Butter Scallops (for 2)


Ingredients:


8 Tbs grass fed butter or ghee
Zest of 1 lemon
Juice of 1 lemon
4 cloves garlic crushed
2 Tbs fresh thyme
1/2 tsp sea salt
1/4 tsp ground pepper
12 oz bag wild sea scallops (20 smaller scallops, or 10 large)
2 average sized zucchinis spiralized or cut into desired size & shape
2 cups fresh spinach
4 Tbs pine nuts

Cook away my pretties! Mwahahaha *she laughs sinisterly*

Directions:


Place pine nuts in a small pan over low heat to toast. It will be tempting to turn up the heat to speed up the process, but don't! You will risk burning them. You will want to keep an eye on the pine nuts the whole time you are cooking the scallops and zoodles, stirring occasionally for even toasting. Remove from heat when they've reached a golden brown color. 

Meanwhile, in a large pan over medium heat melt butter with lemon zest, juice, garlic, thyme, salt & pepper. Allow butter to get hot, without burning. Add the sea scallops to the pan. Cook for approximately 2 minutes on each side, or until firm and opaque. Turn the heat down to medium-low. Remove scallops and set aside. To the sauce, add the zoodles and spinach. Cook until just warmed through and the spinach is just wilted. 

To Plate:


Place the zoodles and spinach on a plate. Top with 10 scallops and drizzle with more sauce. Top with some toasted pine nuts and ENJOY!

Friday, January 31, 2014

Chocolate Chip Coconut No-Bake Refrigerator Cookies

Chocolate Chip Coconut No-Bake Refrigerator Cookies


These are my go-to treat for my littles! They're so easy, I usually always have the ingredients on hand, and they LOVE them!

They requested a treat for this weekend, and since they had regular ol' glutenous pie last weekend-- sorry, but I just couldn't resist the urge to bake one when we had a guest. Shame on me! Wink, wink.-- I decided to go a healthier route this weekend.

Why are these great?

1. Two words: No. Bake.
2. No refined sugar, dairy or grains.
3. They're really yummy.

Ok, need I say more? Oh, yes...I need to say the recipe! Here ya go!

Chocolate Chip Coconut No-Bake Refrigerator Cookies


Ingredients:


1/4c nut butter
1c coconut oil
1.5 c coconut flour
1 c unsweetened shredded coconut
1/2 c pure maple syrup
1/2 bag enjoy life chocolate chips


Directions:


Melt down coconut oil & nut butter. Add maple syrup & mix all three together well. In large bowl mix dry ingredients. Add oil mixture to dry ingredients & mix well. You should have a cookie dough consistency. Grease a small cookie sheet (with sides) or casserole dish with more coconut oil, or line it with wax paper. Pour mixture into pan & press down until it reaches all sides. Put in the refrigerator (away from the light) to harden. Once hardened you an cut into bars, or use a round cookie cutter like it did (just save the extra bits & pieces and sprinkle them on some coconut milk ice cream, if you dare). If you wish to let it soften a bit before cutting, let it sit on the counter for a couple minutes. Store cookies in the refrigerator away from light-- those fridge lights put off a lot of heat, even when not on. I learned that the hard way with a melted glob of refrigerator chocolate!


Serve with some almond milk or coconut milk ice cream & ENJOY!

Wednesday, January 29, 2014

Chicken With Cashew Sauce

Spicy, sweet, and creamy, this cashew sauce is sure to please!

Do you ever look in the fridge and think, "What the heck am I going to make to eat today?"Sometimes those moments birth some of the best recipes! Today was one of those days, and the recipe that resulted from it turned out delicious!

Spicy and a little bit sweet, this recipe was simple to make, and the whole family loved it! I served it over zoodles (zuchinni noodles) that I made with my spiralizer, but it would also be wonderful with cauli rice or spaghetti squash!

Chicken with Cashew Sauce (for 2)


Ingredients:


2 boneless skinless chicken breasts (or 4 thighs)
1/2 cup creamy cashew butter
1/4 cup full fat coconut milk
4 liquid Tbs liquid coconut aminos
4 liquid Tbs water
4 cloves garlic crushed
1 tsp dried ground ginger
1/2 tsp ground red pepper (can add more if you want it spicier)
1/2 tsp sea salt
Roasted red peppers for garnish

Directions:


In a sauce pan over medium-low heat, add all ingredients except for the chicken. Cook until cashew butter is melted and sauce is heated. Stir frequently, and be careful not to burn! You will want to remove the sauce from the heat after it is cooked through so you don't burn it. Cut up the chicken into pieces in whatever size you desire. The smaller they are, the quicker they will cook. In a pan over medium heat, add some fat (I used olive oil) and cook the chicken. Add cooked chicken to the sauce & mix to coat. You can use the pan you cooked the chicken in to cook up your zoodles or cauli rice. I threw my zoodles in there and cooked until al dente.

Plating:


Place the zoodles on a plate. Top with the chicken and sauce. Garnish with roasted red peppers and parsley and ENJOY!


Thursday, January 23, 2014

Bacon Wrapped Jalapeño Mustard Chicken with Twice Baked Avocados


Spicy, creamy,  juicy-- chicken doesn't get better than that!


Really, do I need a long story to go with this? Do I need a reason to slather chicken boobies in mustard sauce and wrap them in bacon? No. I just need to do it. That's all.

Spicy, a little creamy, and definitely juicy, I promise you will love this chicken recipe! The twice baked avocado recipe is just a little bonus. My husband and I love making those!

Hope you all enjoy this as much as we did!

NOTE: Both of these mustards use distilled vinegar. If you wish not to use mustard with vinegar, you can use your favorite vinegar free mustard. It may not have quite the zing to it as the jalapeño mustard, but will still be delicious!


Bacon Wrapped Jalapeño Mustard Chicken (for 4 breasts)


Ingredients:


2 Tbs melted fat (ghee, grass fed butter, lard, etc.)
4 Tbs Organic Jalapeño Mustard (Whole Food's 365 brand)
2 Tbs Organic Dijon (Whole Foods 365 brand)
1 Tbs Flavor God Spicy Everything seasoning*
2 tsp garlic powder
2 tsp ground cumin
2 tsp dried cilantro
8 slices raw bacon
2-3 fresh jalapeños sliced (depending on how spicy you want it)

*If you do not have Flavor God Spicy Seasoning, use the following:
    1 Tbs garlic powder (in place of 2 tsp listed above)
    1 tsp chili powder
    1/2 tsp red pepper
    2 tsp onion powder

Directions:


Juicy breasts for the win!!
Preheat the oven to 375*F. In a bowl mix fat, mustards, and seasonings to make a thick paste-like sauce. Coat each of the chicken breasts with the paste. place a layer of sliced jalapeños on top. Wrap each chicken breast with 2 bacon slices. Place on a cookie sheet or oven safe pan. Top the wrapped breasts with remaining sauce. Bake in the oven for approximately 35 minutes, or until internal temperature reaches 160*F. I always prefer going by internal temperature to ensure a perfectly cooked chicken breast. Remove from oven when done & allow the breasts to sit for about 10 minutes.


Twice Baked Avocados (for 4 halves)


Ingredients:


2 avocados
1 head cauliflower chopped
4 Tbs ghee or grass fed butter
Approximately 4 Tbs coconut milk
Salt & pepper to taste, and any other seasonings you may like. I like to add garlic powder.

Directions:


Preheat oven to 425*F. Slice the avocados in half and remove the pit. If your avocados are ripe enough, remove the meat from the peel without damaging the peel. You will be stuffing them later with the mash. If your avocados are not ripe enough to remove with saving the skin, you will need to bake the avocados in their skin. The skins will be much softer. They'll still be usable, but they'll be a little harder to work with. Place avocado on a piece of foil or small cookie sheet. Bake for approximately 10 minutes. Meanwhile, steam the cauliflower in your preferred method. Just keep in mind that you do not need to add water to cauliflower when steaming as they have a lot of water naturally. Remove avocado from the oven and turn the oven to broil. In a food processor or blender add baked avocado meat, cooked cauliflower, butter and seasonings (do not add milk yet). Begin processing. Slowly add the coconut milk until you get the desired consistency. Fill the saved avocado skins with the avo-cauli mash. Place in the oven on broil and allow to broil until top gets lightly browned. About 5-10 minutes-- keep an eye on them! Remove from the oven and let cool a bit before plating.


Wednesday, January 22, 2014

Laura's Super Bowleo Menu


Anyone who knows me, knows I love football. I grew up watching the sport. We're a football family, for sure. Most of the men on my Father's side played the sport & I can remember that going to my brothers' football games was just a part of Fall.

I didn't really love the sport itself when I was younger. I just loved the atmosphere. The crisp fall air, the cheering crowds, seeing my friends....the Friday Night Lights! Over time, though, it's turned into a genuine love for the sport. I'm not a die-hard like some. I'm not good with players & their stats. I don't play fantasy fooball, but I freaking love watching those guys go after it on the field!!

Food & football go together, and there is not football without the Super Bowl. Of course, because we like to keep it Paleo around here, it's really the Super Bowleo!

I'm sharing my menu with you all in the hopes that those of you who want-- or need-- to keep it gluten/dairy free can still enjoy some of those favorite game day snacks! I have included pics & links to all the recipes, to make planning your menu simple!

Super Bowleo Menu


Bacon Wrapped Stuffed Jalapeños

For starters:


Bacon Wrapped Jalapeños Stuffed with Cilantro Lime Cauli Mash

This is by far one of my FAVORITE dairy free appetizers! A little spicy and zingy with the richness of the bacon. These are sure to please any crowd, and nobody will be missing the cream cheese!


Ques-No Dip and Chips

Ques-No Dip & Chips
Queso dip is something I genuinely miss! While this does use ghee (I use OMghee), it's great for people like me who love their queso dip, but can't handle all that dairy! I promise, the flavor is outstanding. My husband actually gets excited when I make this! The almond chips are crispy and quick to make. This appetizer can be made in advance, also! Just refrigerate the dip to reheat later, and store the chips in a ziploc bag! I'm going to make some extras of the chips to have with the main course!


Classic Chili

Main Course:


Classic Chili

I'll be skipping the cilantro lime cauli rice on this one and I'll be pairing it with some almond chips. Incredibly hearty, legume free, and spicy this one is perfect for serving a big crowd! Just make a big pot & provide the bowls. I promise your guests will not be disappointed!


Spiced Brownie a la Mode with Spiced Rum Sauce

For Dessert:


Spiced Brownie a la Mode with Spiced Rum Sauce

I LOVE this spicy rum chocolate sauce! Since I'll be making dessert only for me (my husband sticks to the ice cream), this is what I'll be making! The two minute single serve brownie is great for one. But, with this recipe, THE SAUCE is the thing. If you want to make this for a crowd, go ahead and make your favorite larger batch of brownies and drizzle with the sauce! I love Bravo For Paleo's Flourless Fudgy Brownies!


Tuesday, January 21, 2014

Bacon Balsamic Roasted Radishes

Never had a cooked radish? Now's your chance!


Bacon Balsamic Roasted Radishes. How's that for alliteration?

Most people have never had a cooked radish. I think that's sad, so I decided to share this recipe with you all. The first time I had a cooked radish was several years ago. I was on this freakishly strict unhealthy low fat, super low carb, super low calorie diet. Radishes were allowed, so I thought I'd steam them one day and see what happens. I loved them!

That diet was far from enjoyable, but cooked radishes most definitely are! I have to admit, though, they are ten times better with bacon.

Radishes contain all the same benefits as other cruciferous vegetables-- cleansing, high in vitamins & nutrients, cancer fighting-- they also are good for the skin & for fighting urinary tract infections!  Needless to say, radishes should be part of our diet. Raw, they can be hot in a similar way that horseradish is hot. But, when cooked, that heat is cooked out and you're left with a neutral earthy flavor.

I don't know about you, but I am always looking for new sides and new ways to eat veggies. If you are as well, I promise you'll love this recipe!

Bacon Balsamic Roasted Radishes


Ingredients:


3 cups cubed radishes
2 Tbs bacon grease, duck fat, olive oil, or fat of choice
2 Tbs coarsely chopped rosemary
1 Tbs thyme
1 Tbs finely chopped sage
2 tsp garlic powder
1/2 tsp sea salt
Dash pepper
3 slices raw bacon chopped
3 liquid Tbs balsamic vinegar

NOTE: If using dried herbs, simply half the recommended measurements.

Directions:


Preheat oven to 375*F. Throw all the ingredients into a ziploc bag. Close the bag and shake until all the radish cubes are coated with fat, vinegar & herbs. Line a cookie sheet with foil (this makes clean up easier). Pour contents of the ziploc bag onto lined cookie sheet and spread out to one single layer. Roast in the oven for approximately 30-35 minutes, stirring half-way through cooking time. When done, remove and let cool a bit. Stir again to coat with the fat & vinegar.

Serve hot, and ENJOY!


Friday, January 17, 2014

Laura's Deer Hash


Dat deer hash doe! See what I did there?


If any of you have families who hunt, like mine, you may be finding yourself with an abundance of venison in your freezer. If you do, lucky you!! I'm personally a big fan of any wild game for a couple of reasons. First, I just like it. I know some people don't like the "gamey" flavor, but it has never bothered me. It's a flavor unique to wild game, and I can appreciate that. Secondly, hunting is a way to balance the environment. I grew up in Indiana where there has always been an abundance of healthy deer. In fact, many years ago they decided to put more restrictions on hunting deer and the result was not good! They had to lift restrictions and temporarily extend the deer hunting season to control overpopulation. John Durant discusses hunting in his new book The Paleo Manifesto, and he talks about the fact that without hunting there can be an overpopulation of certain animals and when that happens, it's the young that suffer because there is a lack of food. Too many deer (or insert wild game here), not enough food. Also, look at what the increase in wild boar/pig population is doing in the South. They are destroying & taking over. Hunting is necessary, but not wasteful!

Let's be honest, it doesn't get more Paleo than eating wild game, and for most people that means venison. There are several cuts, and several different ways to have it processed. Smoked deer sausage is outstanding-- especially a little spicy! And I leap for joy when my Uncle brings me a little bag of deer jerky.

I love deer hash. It's personally my favorite way to eat venison! I'm relatively new to cooking deer meat myself, so I've been working on perfecting my recipe. Venison is a lean meat, and you do have to cut the fat off, so how tender your meat is can vary-- not just from cut to cut, but from animal to animal. How tender the meat is depends on a few things. First, the cut -- rump is more tender than shank, which is why shank is used most commonly for ground meat, and the rump for roast. It also depends on the age of the deer-- the younger the deer, the more tender the meat. And finally, the deer's diet. Deer living near agricultural areas will be more tender from eating a diet of corn and soy beans, but deer from hilly or mountainous areas are less tender from consuming a more wild diet. Living in South Carolina, the venison I have comes from deer that eat a more wild diet, so I have the challenge of dealing with a less tender meat. However, I believe I have figured out a way to get a tender flavorful hash no matter the age or diet of the venison you have.
Freeze those leftovers to save for later!

Also, deer hash freezes fantastically!! Yay for food prep!! Simply double bag some cooled hash meat into freezer safe bags, make sure all air is removed, seal both bags well and freeze!

Tips for tender deer hash:


1. Use a roast cut (usually the rump, neck, or foreleg)
2. Leave the bone in if processing yourself, or request that the bone be left in your roast cuts. Cooking any meat with the bone will make for a more tender meat.
3. Trim off as much fat & skin as possible. It doesn't taste good. Sometimes it doesn't taste like anything, but it's a gamble you don't want to take!
4. Soak your meat in salt water overnight. This draws out the blood, taking some of the gamey flavor out, and it helps to tenderize
5. Add fat to the pot when cooking. This is necessary with such a lean meat.
6. Cook low & slow & long.
7. Use wine. I know that wine is not strictly Paleo, and it is not necessary if you wish to eliminate it, but wine is a natural tenderizer and does make a difference.

Ok, now that I've shared my tips for cooking deer hash, let me share my recipe with you! You can use deer hash just as you would pulled pork or chicken meat. Add to your frittatas, or stuff a Paleo tortilla, or mix with some Mayleo and make a creamy deer hash salad. Stuff jalapenos & wrap them with bacon & bake for a delicious snack or appetizer! The possibilities are endless!

Laura's Deer Hash

Ingredients:


1 venison roast bone-in
1 liquid cup of red wine
1 Tbs onion powder
1 Tbs garlic powder
1 tsp chili powder
1 tsp paprika
1 tsp dried basil
1/2 tsp turmeric
1/2 tsp sea salt
4 Tbs ghee, grass fed butter, bacon grease, or lard of choice
2 Tbs salt (for soak)

Directions:


First, as I stated earlier, soak your roast over night. In a deep bowl or pan, cover meat with water. Add 2 Tbs of salt. Allow the meat to sit in the fridge overnight.

After the roast has soaked, remove from the water and pat dry. In a crock pot, slow cooker, or large oven-safe lidded pot pour in the wine. Make a dry rub mixing all the seasonings together in a bowl. Coat the roast with the dry rub and place into the slow cooker/ crock pot/ oven safe pot. Top with fat/lard of choice. Cover and cook on low (or 275*F in the oven) for at least 6 hours. Check the meat & if it falls apart easily it is done. If not, continue to cook and check hourly. The hash is done when it is falling apart & shredding easily.

When done, remove the bone, pull apart & shred with two forks. Mix the meat up with the liquid at the bottom of the pot.

Serve with my my Butt Smackin' Good BBQ Sauce, a side of my Pink Horsey Slaw, and ENJOY!

Monday, January 13, 2014

Crock Pot Citrus Cumin Leg of Lamb with Citrus Mint Cauli Rice and Cumin Mint Sauce


Sweet and smokey, the combinations of cumin & citrus take this classic up a notch!

Whenever I eat lamb, it makes me think of the aunt in "My Big Fat Greek Wedding" when Toula brings her new boyfriend to a family dinner and she informs her aunt that he is a vegetarian and the aunt says, "What you mean he no eat meat? Oh, it's ok. I make lamb." There are images of this floating around the interwebz, and I laugh every time.

I love lamb. It is probably my favorite meat. It is so rich and flavorful! It is surprisingly versatile, and ground lamb is comparable in price to other high quality grass fed ground meats. There are some people, who have a hard time thinking that they're eating a little lamb-- it's the Disney epidemic. We can't eat Bambi-- never mind that Bambi has some delicious tender meat that is loaded with nutrients. It's the same with lamb. When I was prepping the meat, my youngest son says to me, "Poor wittle wamby," (my son can't quite pronounce his "r' sound properly yet). I always think the same thing for about 1/8 of a second, and then I think about how delicious it's going to be. And, for the record, my son couldn't get enough of the "poor wittle wamby" once he was cooked.

I wanted to do something a little different-- and a little bold. It was a leap of faith, since leg of lamb isn't the cheapest thing you can buy, but I went with my instincts and it turned out incredible! The combinations of sweet citrus and smokey cumin with the rich lamb is outstanding, and the mint sauce pairs so perfectly, cutting through all the richness. You will not be disappointed with this dish. And to top it all off, IT'S FOR THE CROCK POT!!! Talk about a super easy dinner party meal!

I hope you enjoy this meal as much as my family did!

Crock Pot Citrus Cumin Leg Of Lamb


Ingredients:

Fall-off-the-bone tender!

1 5lb bone in leg of lamb
3 small onions peeled and halved
Juice of 3 small oranges
Rinds of squeezed oranges
6 whole cloves garlic peeled
3 tsp ground cumin
Salt & pepper

Directions:


To prep the meat, simply remove any filmy skin like outer layer. Leave any fat in tact. Place onions on the bottom of the crock pot. Put leg of lamb on onions. Squeeze juice over the lamb, then stuff the rinds under the lamb. Rub the cumin onto both sides of the leg. Throw in the garlic cloves. Cook on low for approximately 8 hours, or until meat is tender & falling off of the bone.


Note: If you do not have a slow cooker or crock pot, you can cook this in a covered dish in the oven at 275*F for 6-8 hrs, until meat is tender and falling off the bone.


Cumin Mint Sauce


Ingredients:


4 liquid Tbs water
Zest & juice 1 orange
3 Tbs raw honey
1/2 tsp ground cumin
1/2 liquid cup white wine vinegar
2/3 cup heaping, chopped mint

Directions:


In a small sauce pot over medium-low heat, add everything except cumin, mint and vinegar. Make a simple syrup by cooking the honey & liquid until the liquid has reduced by about half. Then add the remaining ingredients, and continue cooking for about 5 minutes. Remove from heat and allow the sauce to cool a bit.


Citrus Mint Cauli Rice


Ingredients:


1 head of fresh cauliflower chopped
Juice & zest of 1 orange
1/3 c chopped mint leaves
2 Tbs ghee (I use OMghee)

Directions:


Put cauliflower, orange zest & juice, and mint leaves into a food processor or blender. Pulse until the cauliflower is the size of rice. In a pan over medium heat, melt ghee. Toss the cauli rice into the pan cooking until just softened (or to your own desired consistency).

To Plate: Place some cauli rice on the plate, top with some of the fall-off-the-bone meat, and drizzle with the sauce. Top with a fresh sprig of mint and ENJOY!